WANT TO BE A HACKER :USE KALI LINUX
welcome back, my apprentice hackers!
As many of you know, I have been hesitant to adopt the new Kali hacking system from Offensive Security. This hesitancy has been based upon a number of bugs in the original release back in March of 2013 and my belief that BackTrack was easier for the novice to work with.
In recent days, Office Security has discontinued the downloads of BackTrack (although it is still available from many torrent sites), and the release of Kali 1.0.6 in January of 2014 repaired many of the known bugs, so I am now converting to Kali!
The Differences Between Kali & BackTrack
Those of you who are using BackTrack, don't worry, things are very similar. Some tools are in different places, but in general, Kali is very similar to BackTrack. One of the first things you may notice different about Kali is that it is built on Debian Linux instead of Ubuntu Linux. This won't create dramatic differences, but some subtle ones.
One of the reasons that the folks at Offensive Security gave for converting from Ubuntu to Debian is that they are not comfortable with the direction that Ubuntu is going. BackTrack was built on Ubuntu 10.04 and that Ubuntu release was scheduled for non-support. That would have left BackTrack without an Ubuntu release they were both comfortable with and had support.
The transition from Ubuntu to Debian should not be difficult as Ubuntu began as a fork of Debian and share many of the same features and conventions.
The Advantages of Using Kali Over BackTrack
Some of the advantages of using Kali include the following.
- The GNOME interface, if you are familiar with it.
- Some new tools.
- Updates on some old tools such as Metasploit, p0f, etc.
- Continuity into the future as Ubuntu pursues its own agenda that is inconsistent with hacking and security.
- You can now invoke any tool from any directory as all tool directories are in the PATH variable.
- We now have a build specifically designed for the ARM architecture.
Now that you know the basic information, let's get started using it.
Step 1Download & Burn Kali
First navigate to kali.org; you should see a page like this:
Now, let's click on the tab at the top that says "Downloads" and you should be greeted with a screen similar to this.
As you can see, you have a choice of 64-bit, 32-bit, ARMEL, or ARMEH.
For most of you with a 64-bit OS and 64-bit processor, you will want to download the 64-bit ISO. If you are not sure, download the 32-bit, it will run on either a 32-bit or 64-bit system.
The other two options are for the ARM processors that are in such devices as smartphones and tablets. We will be working with those in a later tutorial (think of the possibilities...hacking from a smartphone, tablet, and even a Raspberry Pi).
Make certain that you have about 3 GB of available hard drive space as these downloads are about 2.9 GB each.
Once you have downloaded Kali (it takes an hour or two depending upon your connection speed), burn it to a DVD. If you need help burning an ISO to a DVD, check out Step 2 in my past guide on installing BackTrack. It's the same process.
Step 2Install Kali
Installing Kali is similar to installing BackTrack. For our purposes here, I would recommend installing into a virtual machine (VM). In that way, you can practice hacking between systems all on your box and evade breaking any laws and being separated from your computer for a few years.
Probably the two best virtualization systems are VMWare's Workstation and Oracle'sVirtual Box. I use both and I have to give the nod to Workstation as easier to use and more glitch-free, but since Oracle bought Sun Microsystems a few years ago (and its Virtual Box), Virtual Box has been getting better and better.
A big difference between the two is price. VMWare's Workstaion is about $180 and Oracle's Virtual Box is free. Can't beat that price!
Remember, like BackTrack, you can log in as "root" with a password of "toor". Then, type "startx" to start the X-Windows system.
The Disadvantages of Using a VM
There are three primary disadvantages of using a VM. First, resource usage. Running a VM requires additional RAM to run well. It will run in 4 GB, but slowly. I recommend 8 GB as a minimum.
Second, to do wireless hacking from a VM, you will need an external wireless card. In reality, to do effective wireless hacking, you will need an aircrack-ng-compatiblewireless card, so if you choose the VM route, make certain to buy an aircrack-ng compatible wireless card.
Third, the virtualization system adds an additional level of complexity that can prove daunting to the beginner.
If Not Using a VM, Dual Boot Instead
The other option is to install it as a dual boot system. To do so, first, change the boot sequence on your system to boot first from your DVD/CD drive. Then, you can simply boot Kali from the DVD you burned from the ISO image you downloaded.
Once it boots, you then click on the install Kali icon in the upper left-hand corner. The install wizard will walk you through the steps to partition your hard drive so that you can have two or more operating systems on the hard drive and simply boot into which ever one you please.
The advantages of a dual boot system are multi-fold. First, Kali will run faster with less resources. Two, you will NOT need an additional wireless card (but it is still recommended). Third, you will not have the additional complexities of working in a VM.
Step 3Navigate in Kali
Once we have Kali installed, you can see that it looks similar to BackTrack with the same background and logo. Also, unlike BackTrack, you don't have the choice of interfaces.
The only interface Kali offers is the ever popular GNOME interface (I prefer KDE, but I will now be working in GNOME in Kali). Of course, you can download the KDE interface if you prefer and install and run it.
Step 4The GNOME/Kali Interface
If you have used another Linux distribution with the GNOME interface, the pull-down menus at the top of the desktop will be familiar to you.
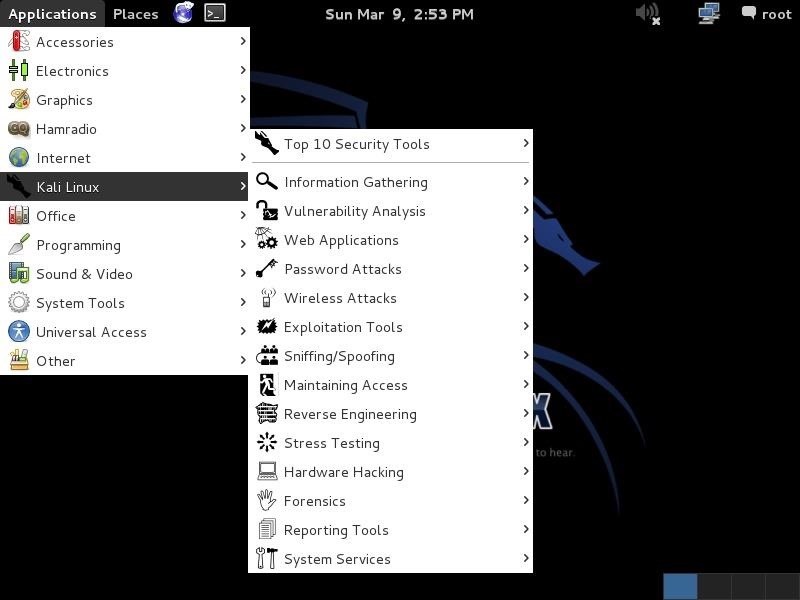
The applications menu to the very far left is the one we are most interested in. When we pull it down, you can see the "Kali Linux" menu about midway down. That is where we will start most of our hacks (remember, though, that one of the advantages of Kali is that we can invoke any tool from any directory from the terminal, so that menu system will be less necessary).
Just like BackTrack, it then subdivides our hacking tools into various categories.
Step 5The Top Ten Security Tools
One of the many things that the folks at Offensive Security added to Kali was a "Top Ten Security Tools" menu. As you can see below, this includes some of my favorite tools such as nmap, Metasploit, sqlmap, Wireshark, and aircrack-ng among others.
Keep coming back, my apprentice hackers, as we explore further the nefarious capabilities of Kali!


